By Ayush Patil
The challenge at hand is to modernize the deployment and scaling of a web application by implementing a three-tier architecture on Amazon Web Services (AWS) through infrastructure automation using Terraform.
What is Terraform?
Terraform is an open-source Infrastructure-as-Code (IaC) tool by HashiCorp. It lets you define and manage infrastructure through code, automatically creating, updating, or deleting resources to match your desired state. This approach brings predictability, version control, and automation to infrastructure management.
What is Infrastructure as Code (IaC)?
IaC automates infrastructure provisioning and management with code. Instead of manual configurations, tools like Terraform enable you to define infrastructure using code that’s versioned, testable, and ensures consistent and repeatable deployments.
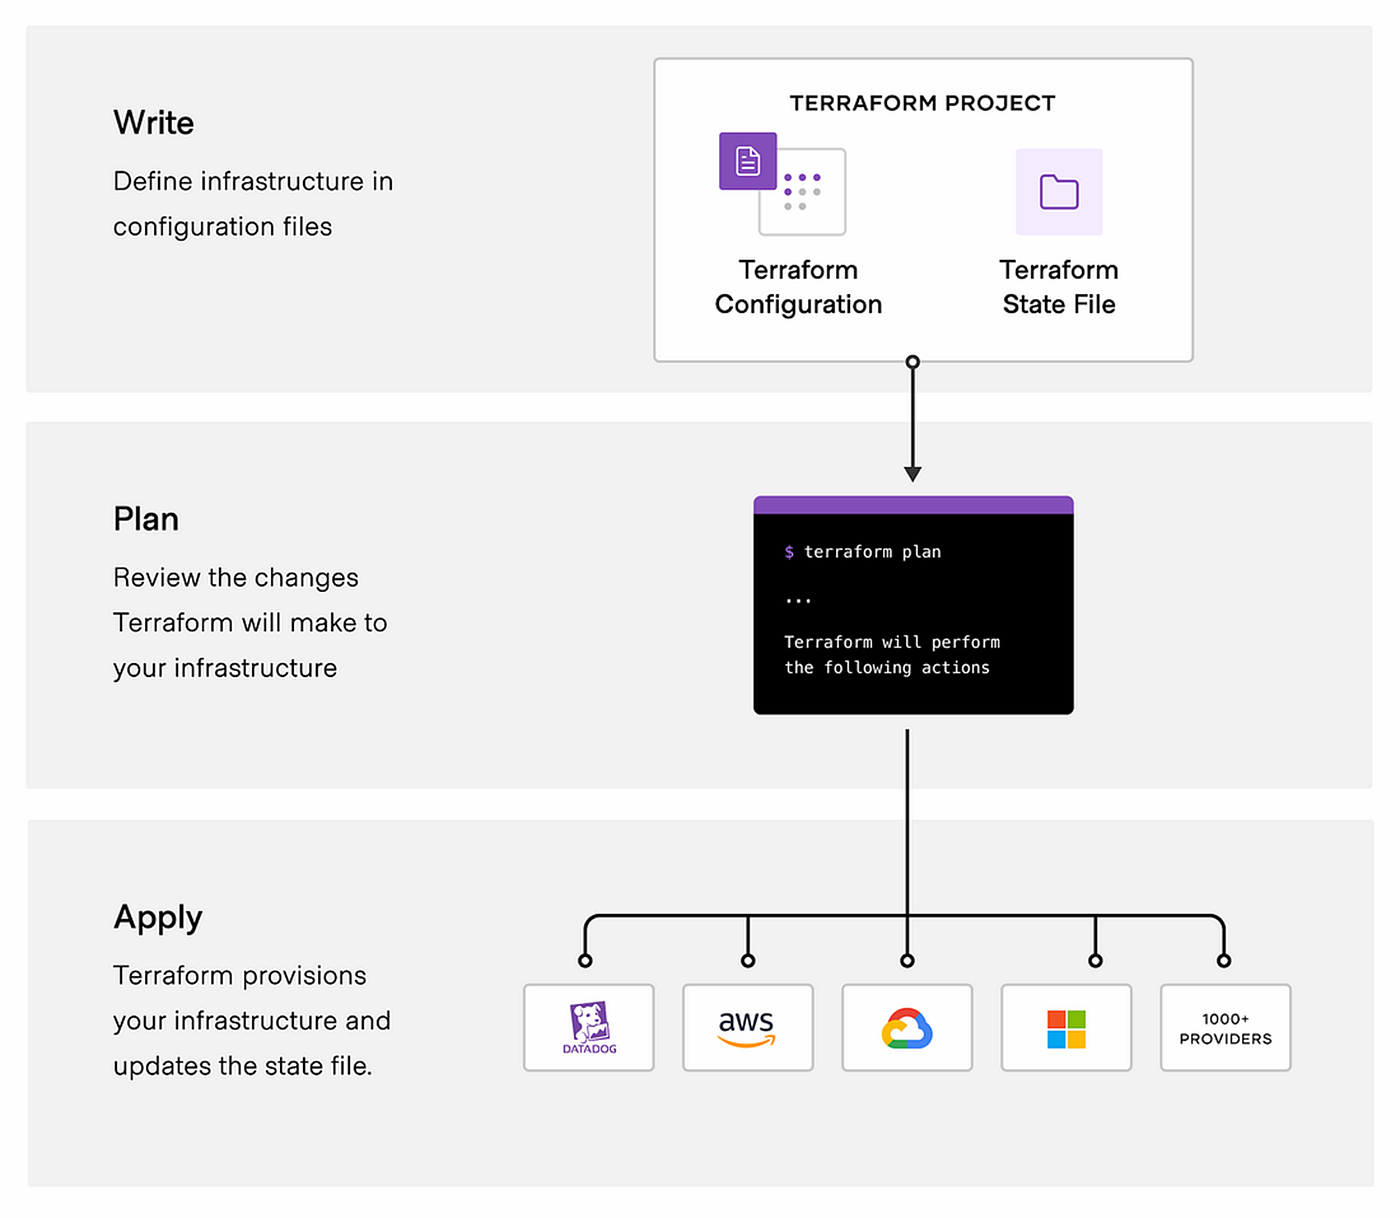
How does terraform Works?
1: Write
2: Plan
3: Apply
This flow diagram will explains you working of Terraform.
Basic Terraform Commands:- for more information refer
- Terraform init Command
- Terraform plan Command
- Terraform apply Command
- Terraform destroy Command
Basic Terraform terms:-
Variables in Terraform: Placeholders for dynamic values in your configurations, making them flexible and reusable. Variables can be defined separately or inline, allowing changes without altering the code (e.g., specifying the number of EC2 instances or network names).
Resources in Terraform: Infrastructure components you manage. They include physical resources like EC2 instances, VPCs, and databases, defined using resource blocks in Terraform configuration. Terraform uses these blocks to create, update, or delete resources to match your code’s desired state.
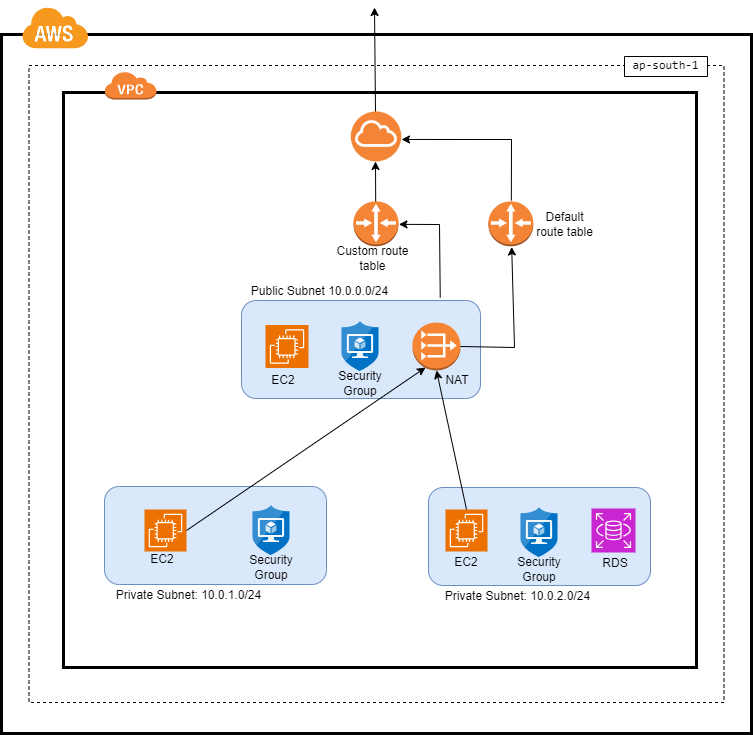
Understanding the Architecture
A three-tier architecture is a common design pattern for building scalable and modular web applications. It divides an application into three interconnected layers or tiers: the presentation tier, the application tier, and the data tier. Each tier serves a specific function and is often deployed on separate sets of resources.
Architecture Overview:
- Components of architecture: Custom Virtual Private Cloud(VPC),
Internet Gateway, 3 Subnets, EC2 instances, Two Route Tables with route table Association, NAT Gateway, RDS - Create a custom VPC with a specified CIDR Range.
- Set up an Internet Gateway to connect the VPC to the internet.
- Establish three subnets, including one public and two private subnets.
- Configure route tables and associate them appropriately.
- Create a NAT Gateway to enable private instances to access the internet through the public subnet.
- Deploy an RDS database for storing application data, known as RDS.
Environment Setup Prerequisites:
- AWS Account Access Keys: To manage resources, you must have an AWS account and access credentials. Create keys in the IAM section of the AWS interface.
- AWS CLI Installation: Install the AWS CLI on your machine to interact with AWS services efficiently.
- Terraform Installation: Install Terraform, an infrastructure-as-code tool by HashiCorp, to define and manage infrastructure reliably with the help of code.
- AWS Profile Configuration: Use the AWS CLI to set up a profile with your access keys and preferred region for deployment. Use “aws configure” in your terminal to do this.
- VS Code Installation: Install Visual Studio Code (VS Code) for code editing and a comfortable development environment.
Steps to create the above Architecture:
Step 1: Defining a provider and also region
Reference: AWS terraform provider
# Mentioning provider
provider "aws" {
region = "ap-south-1"
}
Step 2: Creating custom VPC
Create a custom VPC with the IPv4 address range “10.0.0.0/16”. Here I have enabled DNS support and hostnames and assigned a tag “Name” with the “Architecture_1” for identification.
Reference: AWS terraform VPC
# Custom VPC
resource "aws_vpc" "vpc" {
cidr_block = "10.0.0.0/16"
enable_dns_support = true
enable_dns_hostnames = true
tags = {
Name = "Architecture_1"
}
}
Step 3: Creating Subnet
In this block I have set up one public subnet and two private subnets in the AWS VPC created earlier. The public subnet allows instances to have public IP addresses by default, while the private subnets are for internal resources. It specifies the VPC ID, CIDR block, availability zone, and assigns a tag with the name “private-subnet1” to the subnet.
# Public Subnet
resource "aws_subnet" "public_subnet" {
vpc_id = aws_vpc.vpc.id
cidr_block = "10.0.0.0/24"
map_public_ip_on_launch = true
availability_zone = "ap-south-1a"
tags = {
Name = "public-subnet"
}
}
# Private Subnet 1
resource "aws_subnet" "private_subnet" {
vpc_id = aws_vpc.vpc.id
cidr_block = "10.0.1.0/24"
availability_zone = "ap-south-1a"
tags = {
Name = "private-subnet"
}
}
# Private Subnet 2
resource "aws_subnet" "private_subnet1" {
vpc_id = aws_vpc.vpc.id
cidr_block = "10.0.2.0/24"
availability_zone = "ap-south-1b"
tags = {
Name = "private-subnet1"
}
}
Reference: AWS terraform Subnets
Step 4: Creating Security Group for ec2 and rds:
It specifies the VPC ID, name, description, and sets up ingress (inbound) and egress (outbound) rules.
Reference: AWS terraform Security Group
#aws_security_group
resource "aws_security_group" "sg" {
vpc_id = aws_vpc.vpc.id
name = "security-group"
description = "Allow SSH, HTTP, HTTPS, and MySQL"
# Ingress rules(inbound)
ingress {
from_port = 22
to_port = 22
protocol = "tcp"
cidr_blocks = ["0.0.0.0/0"]
}
ingress {
from_port = 80
to_port = 80
protocol = "tcp"
cidr_blocks = ["0.0.0.0/0"]
}
ingress {
from_port = 443
to_port = 443
protocol = "tcp"
cidr_blocks = ["0.0.0.0/0"]
}
ingress {
from_port = 3306
to_port = 3306
protocol = "tcp"
cidr_blocks = [aws_subnet.private_subnet1.cidr_block]
}
# Egress rules (outbound)
egress {
from_port = 0
to_port = 0
protocol = "-1"
cidr_blocks = ["0.0.0.0/0"]
}
}
Step 5: Creating EC2 instance (Total 3 instances)
It specifies the AMI (Amazon Machine Image), instance type, key name, monitoring settings, security group, subnet ID, and assigns a tag with the name “nginx” to the instance.
Reference: AWS terraform ec2
# 1st EC2 (Public Instance)
resource "aws_instance" "nginx" {
ami = "ami-0ff30663ed13c2290"
instance_type = "t2.micro"
key_name = "key11"
monitoring = true
vpc_security_group_ids = [aws_security_group.sg.id]
subnet_id = aws_subnet.public_subnet.id
associate_public_ip_address = true
user_data = "${file("data.sh")}"
tags = {
Name = "first-ec2"
}
}
# 2nd EC2 (Private instance)
resource "aws_instance" "web" {
ami = "ami-0ff30663ed13c2290"
instance_type = "t2.micro"
key_name = "key11"
monitoring = true
vpc_security_group_ids = [aws_security_group.sg.id]
subnet_id = aws_subnet.private_subnet.id
tags = {
Name = "second-ec2"
}
}
# 3rd EC2 (Private instance)
resource "aws_instance" "web1" {
ami = "ami-0ff30663ed13c2290"
instance_type = "t2.micro"
key_name = "key11"
monitoring = true
vpc_security_group_ids = [aws_security_group.sg.id]
subnet_id = aws_subnet.private_subnet1.id
tags = {
Name = "third-ec2"
}
}
Step 6: Setup Internet Gateway
It specifies the VPC ID and assigns a tag with the name “Internet_Gateway” to the gateway.
Reference: AWS terraform internet gateway
# Internet Gateway
resource "aws_internet_gateway" "gw" {
vpc_id = aws_vpc.vpc.id
tags = {
Name = "Internet_Gateway"
}
}
Step 7: Route Table for Public Subnet
It specifies the VPC ID and assigns a tag with the name “public_route” to the route table.
Reference: AWS terraform Route Table
# Route Table for Public Subnet
resource "aws_route_table" "public_route_table" {
vpc_id = aws_vpc.vpc.id
tags = {
Name = "public_route"
}
}
Step 8: Route for Public Subnet
It specifies the route table ID, destination CIDR block, and the internet gateway ID.
Reference: AWS terraform Route
# Route for Public Subnet
resource "aws_route" "public_route" {
route_table_id = aws_route_table.public_route_table.id
destination_cidr_block = "0.0.0.0/0"
gateway_id = aws_internet_gateway.gw.id
}
Step 9: Associate the custom route table with the public subnet
This block associates the custom route table created in the previous block with the public subnet.
Reference: AWS terraform Route table association
# Associate the custom route table with the public subnet
resource "aws_route_table_association" "subnet_association" {
subnet_id = aws_subnet.public_subnet.id
route_table_id = aws_route_table.public_route_table.id
}
Step 10: Setup NAT Gateway
- It specifies the allocation ID and the public subnet ID.
- This connects private subnet to internet
Reference: AWS terraform NAT Gateway
# NAT Gateway
resource "aws_nat_gateway" "nat" {
allocation_id = aws_eip.eip.id
subnet_id = aws_subnet.public_subnet.id
}
Step 11: Creating RDS:
It specifies the instance identifier, allocated storage, engine, instance class, username, password, engine version, skip final snapshot, subnet group name, and security group
Reference: AWS terraform RDS
# Creating RDS
resource "aws_db_subnet_group" "dbsubnet" {
name = "main"
subnet_ids = [aws_subnet.private_subnet.id, aws_subnet.private_subnet1.id]
}
resource "aws_db_instance" "db" {
identifier = "database" # This is the instance identifier
allocated_storage = 20
engine = "mysql" # This is the database type
instance_class = "db.t2.micro"
username = "arch"
password = "1starchpass"
engine_version = "8.0.33" # This is the version of MySQL
skip_final_snapshot = true
db_subnet_group_name = aws_db_subnet_group.dbsubnet.name
vpc_security_group_ids = [aws_security_group.sg.id] # This is the security group
}
Step 12: Creating Elastic IP:
Reference: AWS terraform Elastic IP
# Creating Elastic IP (EIP)
resource "aws_eip" "eip" {
domain = "vpc"
depends_on = [aws_internet_gateway.gw]
}
How to run this code:
Step 1: Save the file with “.tf” extension
Step 2: Open new terminal
Step 3: Run >> terraform init
Step 4: Run >> terraform plan
Step 5: Run >> terraform apply
Step 1:Run >> terraform destroy
Troubleshooting that you might need:
- Unable to run terraform commands: Ensure that you have installed terraform properly and environment variables are set properly.
- Unable to connect to ec2 instance
- Security Group: Ensure the security group allows incoming traffic on the necessary ports.
- Network ACLs: Confirm network ACLs allow the required traffic.
- Route Table: Verify the public subnet’s route table directs traffic to the Internet Gateway.()
- Public IP: Ensure the EC2 instance has a public IP or Elastic IP assigned.
- Route Table Associate: Ensure custom route table is properly associated with the public subnet.
- Instance Status: Check the instance is running.
Infrastructure Automation: Key Use Cases
Automation of infrastructure using tools like Terraform has a wide range of use cases across various industries and scenarios. Here are some common use cases:
- Cloud Resource Management: Automate the provisioning and management of cloud resources in AWS, Azure, and other cloud platforms.
- Immutable Infrastructure: Implement a “destroy and recreate” approach for enhanced reliability and consistency.
- CI/CD Integration: Integrate automation into continuous integration and continuous deployment (CI/CD) pipelines.
- Security and Compliance: Ensure security and compliance by automating resource configurations.
- Testing and Staging Environments: Create and manage isolated environments for testing and development.
- Cost Optimization: Optimize costs by automatically adjusting resource capacity and usage.
- Container Orchestration: Manage container orchestration platforms like Kubernetes with automation.
- Monitoring and Logging: Automate the setup of monitoring, alerting, and logging for infrastructure.
Scaling and Automating with Terraform:
As your web application grows and user demands increase, Terraform becomes a powerful ally. It enables auto scaling of EC2 instances, multi-AZ deployments for high availability, and dynamic adjustments like adding RDS read replicas. Furthermore, Terraform excels in automation, seamlessly integrating with CI/CD pipelines, scheduling scaling actions, and maintaining infrastructure as code repositories. By scaling and automating your architecture with Terraform, you address scalability challenges, maintain consistency, boost efficiency, and enhance your application’s agility. Embrace Terraform to future-proof your infrastructure and stay ahead in the ever-evolving world of web applications.
Conclusion:
In conclusion, we have successfully designed and implemented a three-tier architecture for our web application infrastructure using Terraform and AWS resources. Terraform’s infrastructure-as-code approach allowed us to define and manage our infrastructure reliably and efficiently. By adopting these best practices in infrastructure automation, organisation can focus on what truly matters: developing and delivering innovative web applications, knowing that their underlying infrastructure is robust, secure, and capable of scaling with the evolving needs of their users. This approach ensures that deployment of infrastructure supports the continuous innovation and growth of online services in today’s dynamic digital landscape.